

A Helpful Guide For Creating Your First Custom Match
Hi everyone,
Earlier this week we announced the open beta test for custom matches. This is something that many people have been waiting for a long time, and we’re sure a ton of you are eager to try out creating your own games!
With so many options and settings to play around with, some of you will probably feel a bit lost when setting up your first ever custom match. For that reason, we’ve created the user guide below to help explain how it all works.
As mentioned above, this is an open beta test, so keep in mind that there may be various changes made to the system over time. We’ll likely tweak things to reflect your feedback. Other changes in consideration of server or game stability may come as well (such as limitations on total number of sessions, or conditions for creating custom matches).
For now, let’s get into the details!
- Create Custom Match
- Normal Mode
- Zombie Mode
- War Mode
- Esports Mode
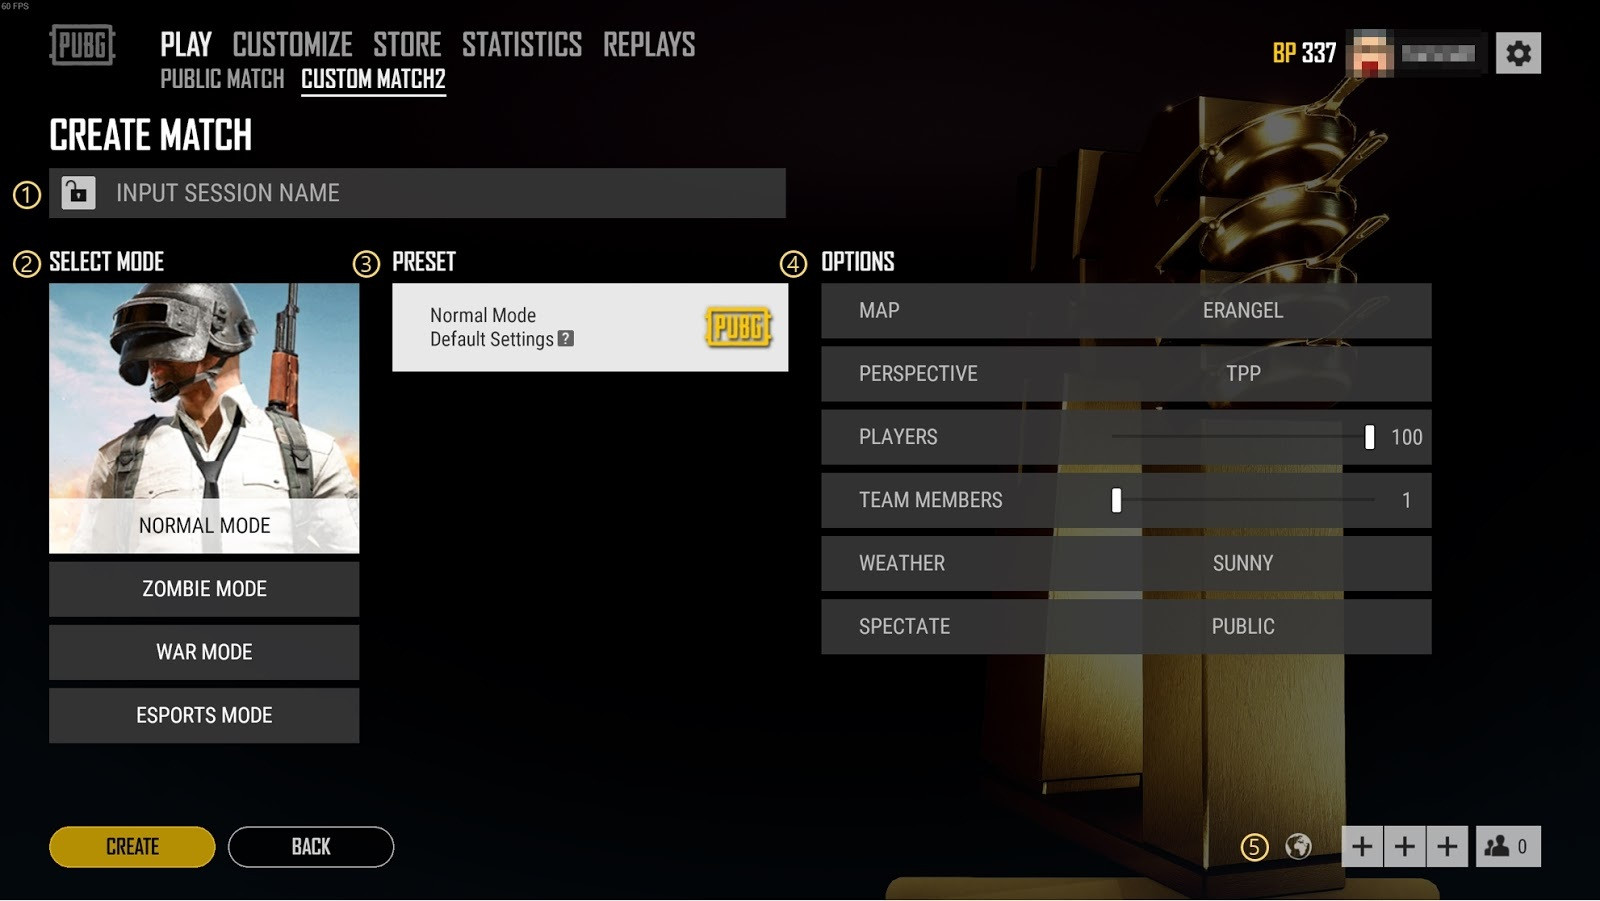
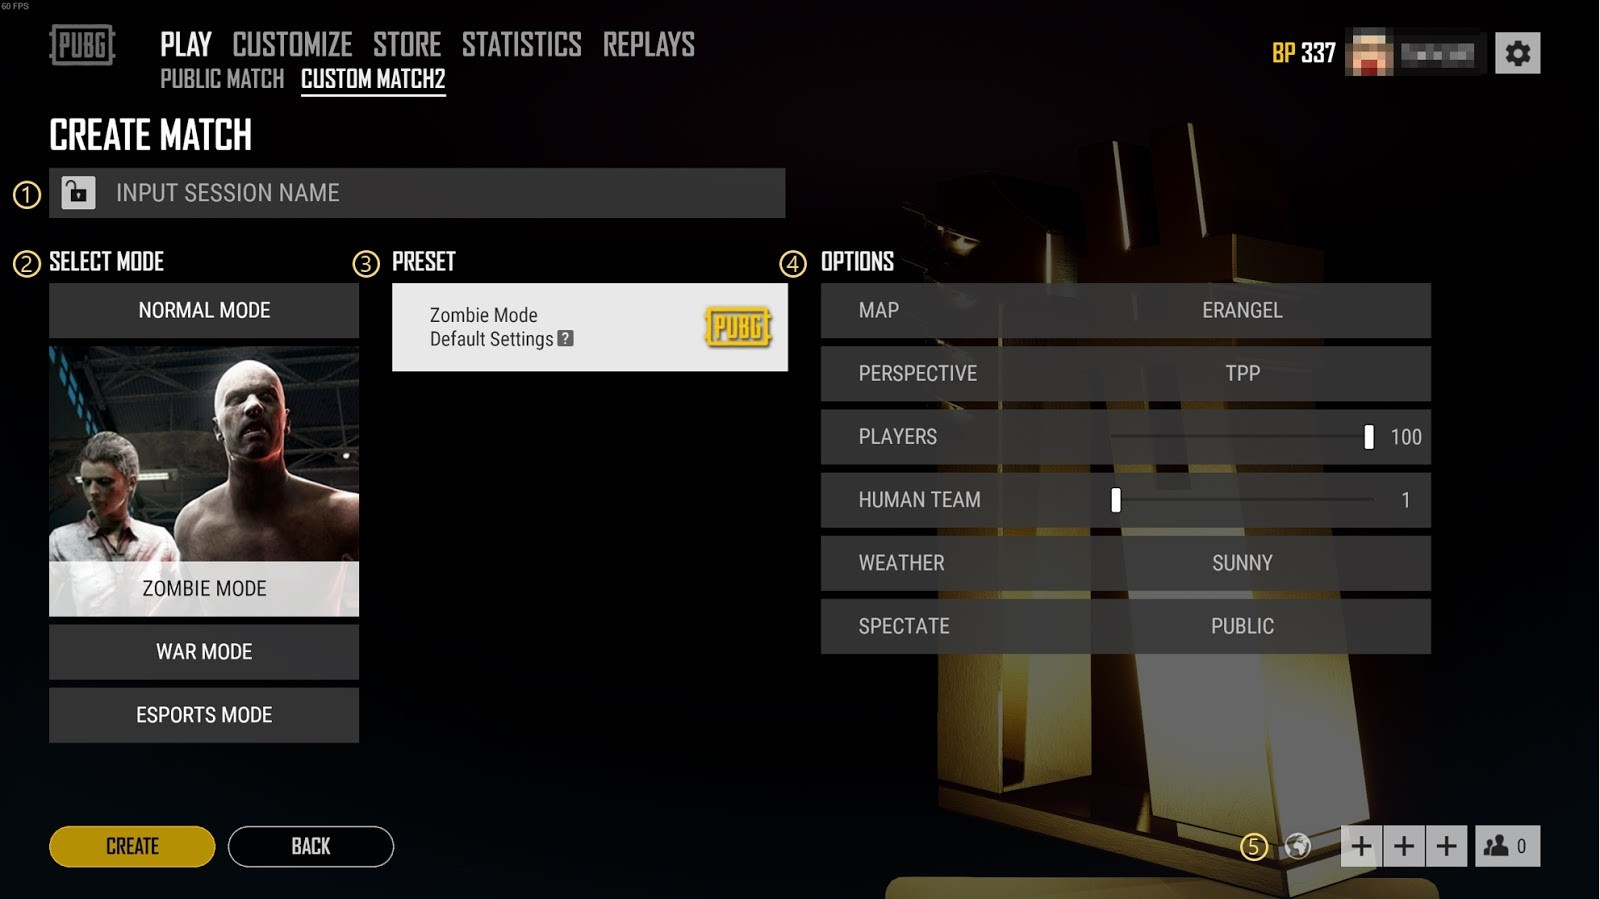
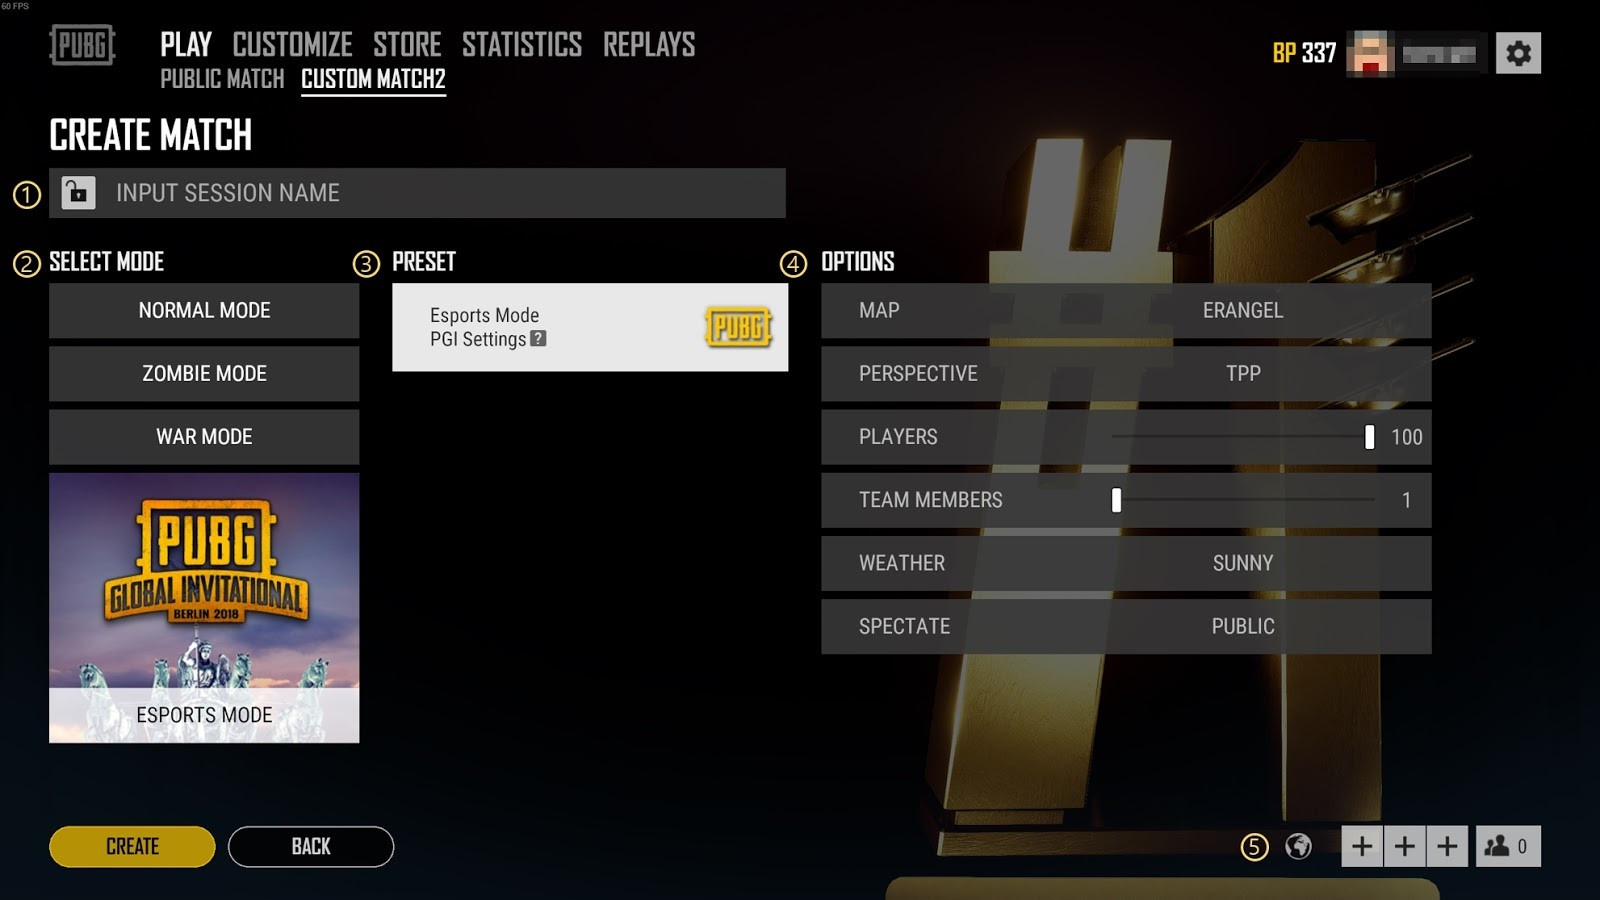
- Name your custom match and set it to either public or private.
- Select a game mode (normal is the standard “battle royale” experience).
- Select a preset—more of these will be made available over time.
- These are default settings which are necessary to create any custom match.
- The game will be created on the regional server location selected on the lobby screen.
Note: Currently a minimum of 10 players are required before being able to start the match.
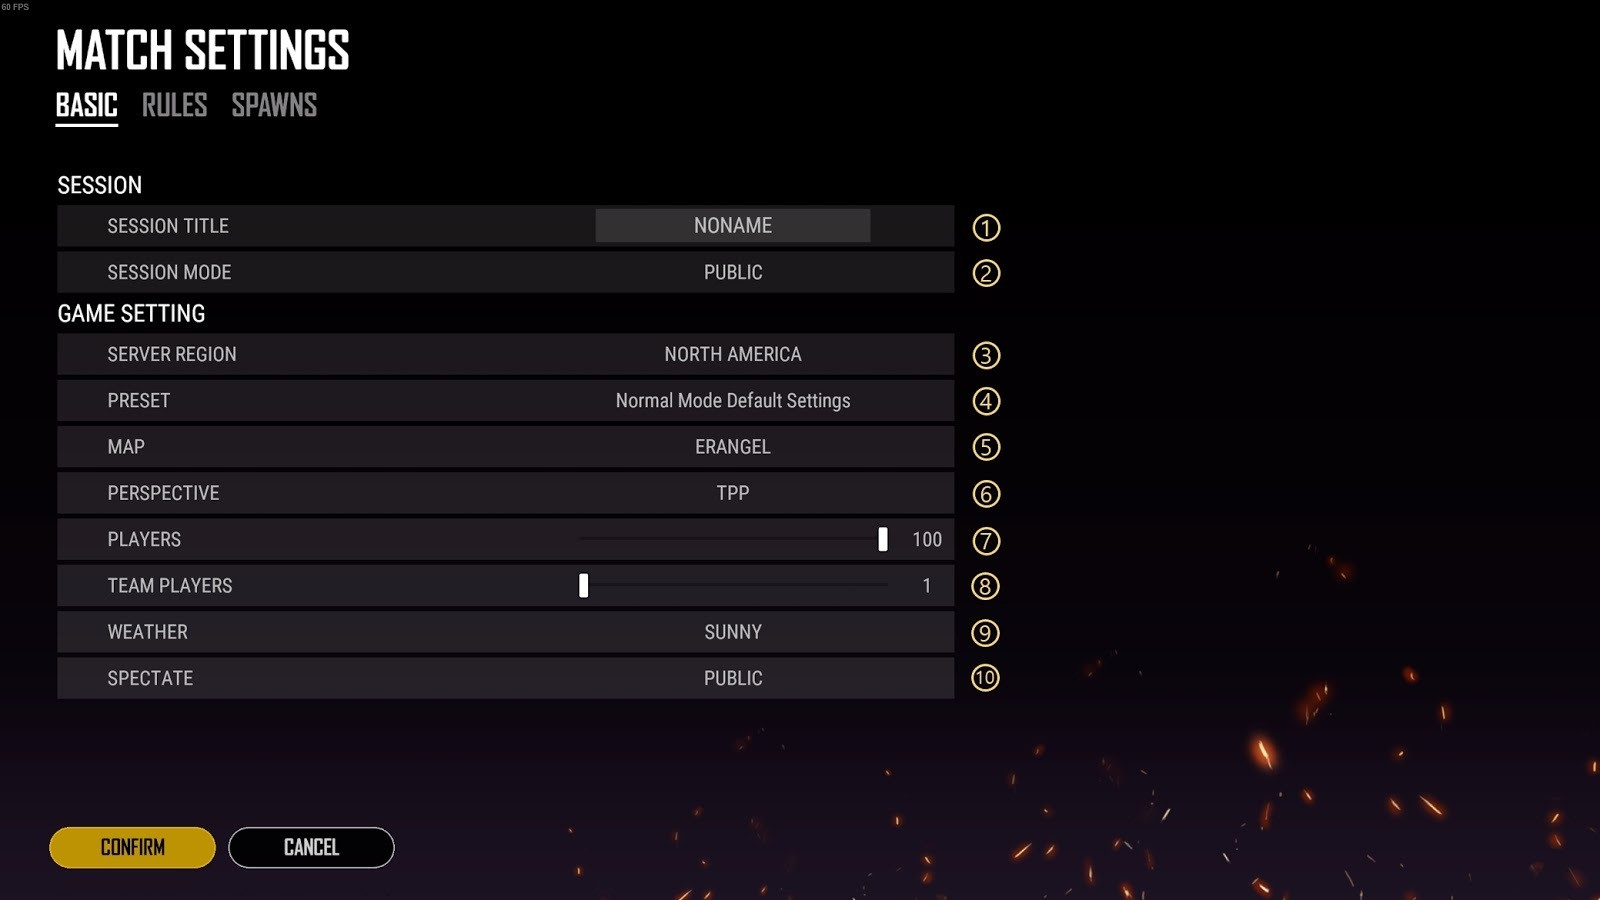
Once the lobby is created, you can then access the following settings via the “Match Setting” button.

- You can change your custom match name here.
- Choose whether your session will be public or private (with a password).
- Displays selected server region. It will default to the region you’ve set on the main menu lobby screen and can’t be changed here.
- Set the current game mode preset (not implemented yet, but will be updated in the future).
- Select the map.
- Select the perspective you want your match to be played in.
- Set the max player limit for your match. 10 players are required before the match can start.
- Set the number of players per team.
- Set the weather for the match.
- Set the spectate function to public or private.
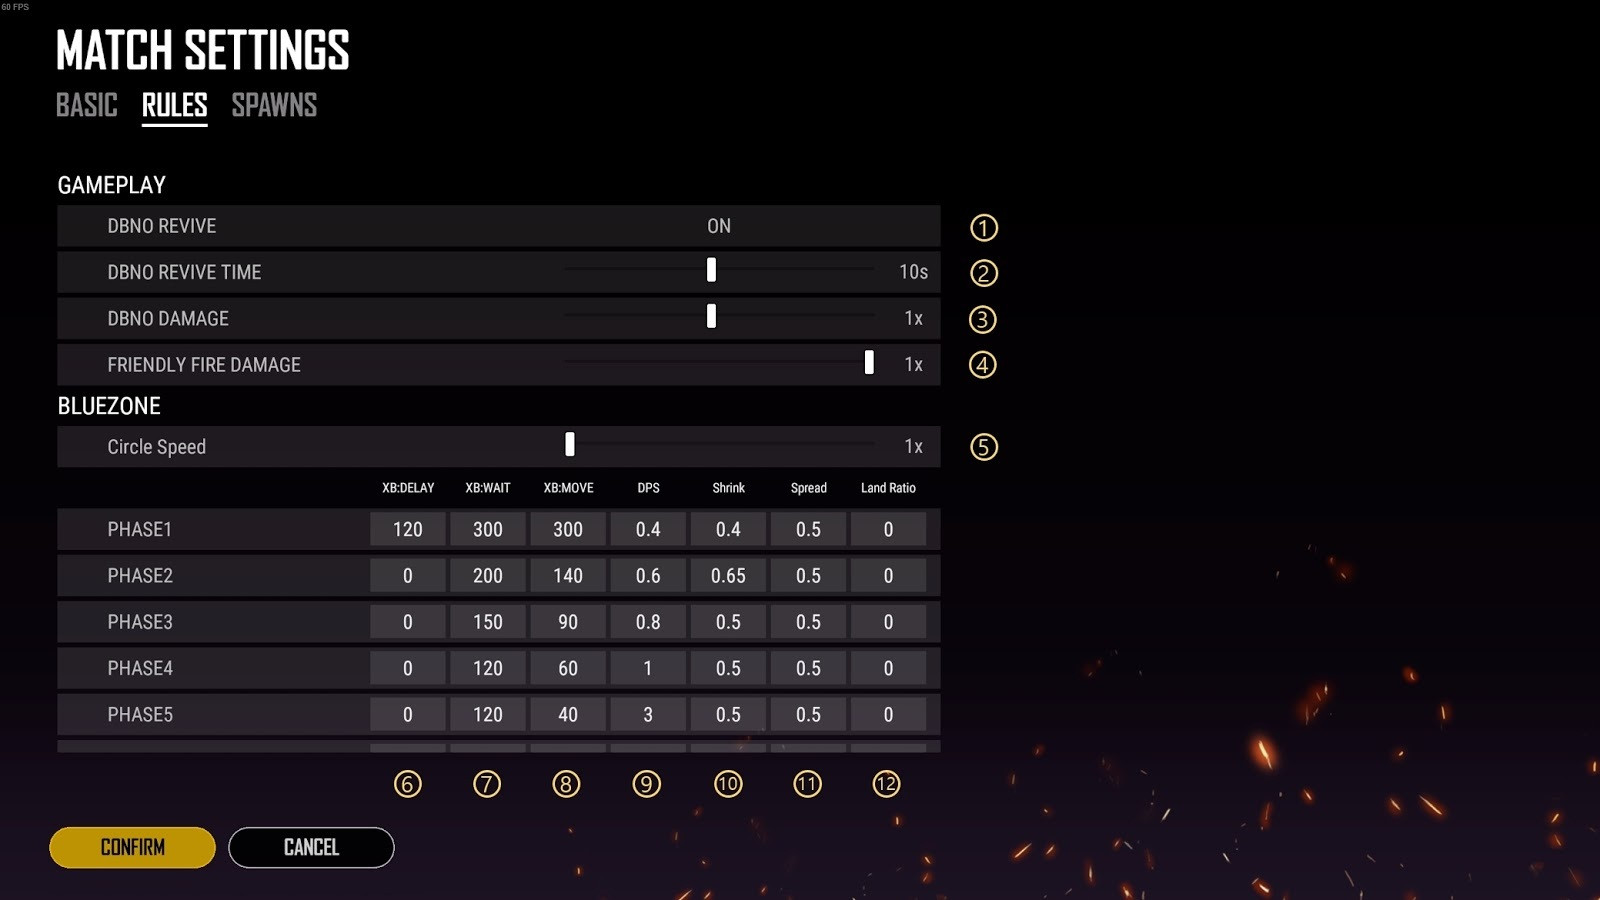
- “DBNO” refers to “Down But Not Out.” If turned off, kills will be instant (no “knocks”)
- Adjust the amount of time required to revive downed players.
- This controls how quickly downed players bleed out.
- Adjust damage inflicted by friendly fire. Make it a lot... or not a lot!
- This sets how quickly the blue zone will move during each phase. Leave this at 1x if you want to change the speed of each phase individually.
- Set the delay for when the next safe zone will appear.
- This setting controls the time until the blue zone starts moving once the next circle has been shown.
- Adjust how fast the blue zone moves during each phase .
- Set how much damage the blue zone deals.
- This number controls how small each safe zone will be compared to the previous safe zone. (0.1 will make it 10% the size of the previous safe zone).
- The number indicates the likelihood of the next safe zone appearing closer to the center of the current circle (10 creates the next safe zone right in the center). For the first phase, setting this to 10 will make the safe zone appear in the center of the map.
- Adjust the probability of the center of the next safe zone being on land (e.g. 0.1 for 10%, 0.5 for 50%)
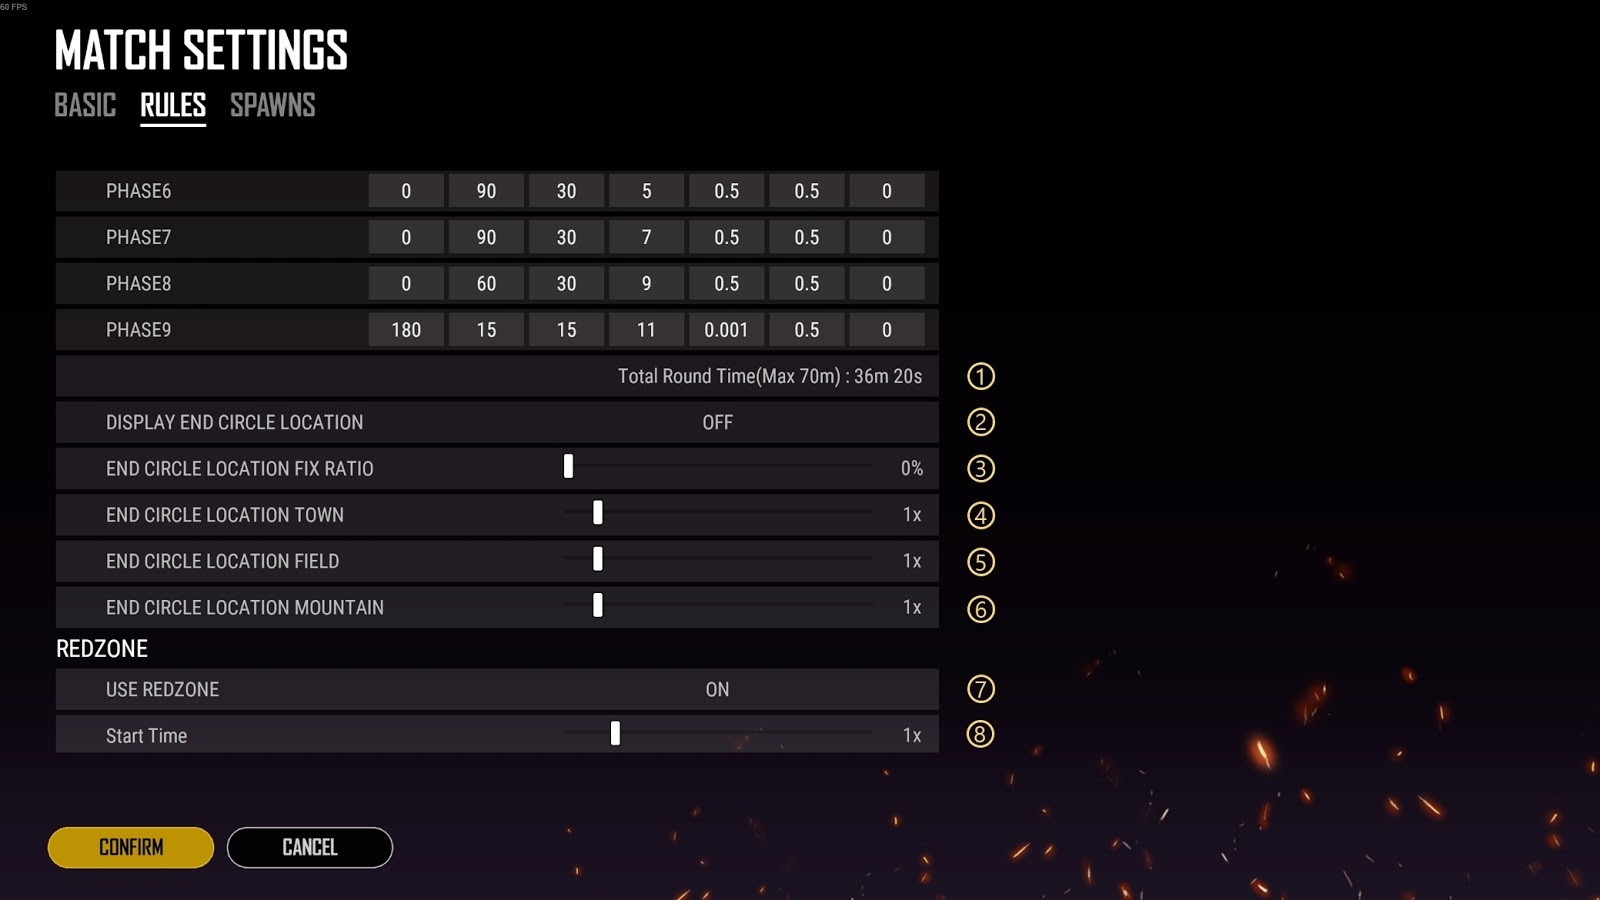
- This indicates the total round time.
- Choose whether to display the location of the final safe zone (only works if the “END CIRCLE LOCATION FIX RATIO” is set to somewhere between 1% and 100%
- Adjust the probability that the final blue zone will end within the “END CIRCLE LOCATION” parameters set for town/field/mountain. If set to 0, the end circle location will be completely random.
- Adjust the probability that the final blue zone will be centered in a city or town.
- Adjust the probability that the final blue zone will be centered in a field.
- Adjust the probability that the final blue zone will be centered on a mountain.
- Toggle the redzone on or off.
- Set how quickly the first redzone will appear, compared to normal.
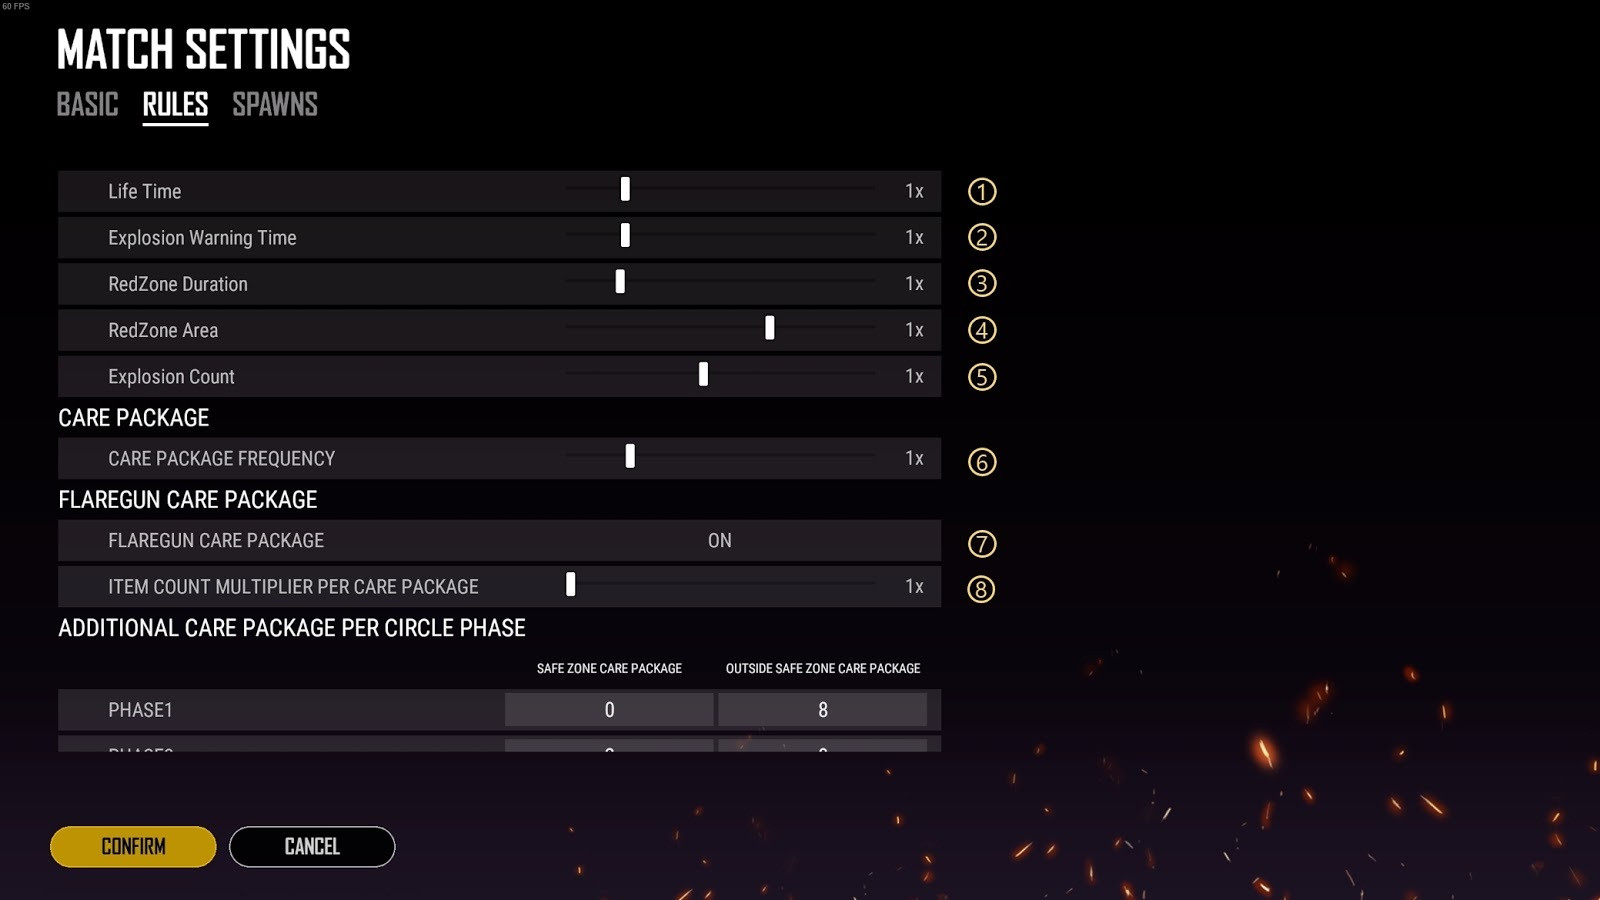
- Set the frequency of redzones, how often they appear on the map.
- Adjust how much warning time you’ll be given before the redzone’s bombs start to drop, once the redzone is shown on the map.
- Adjust how long each redzone will last.
- Set the size of each redzone.
- Adjust how many bombs fall in each redzone (a higher number means more boom).
- Set the spawn rate for care packages (set to 0 to turn them off entirely).
- Allow special care packages to be called using flareguns.
- Adjust the number of items contained in the care packages called using flareguns
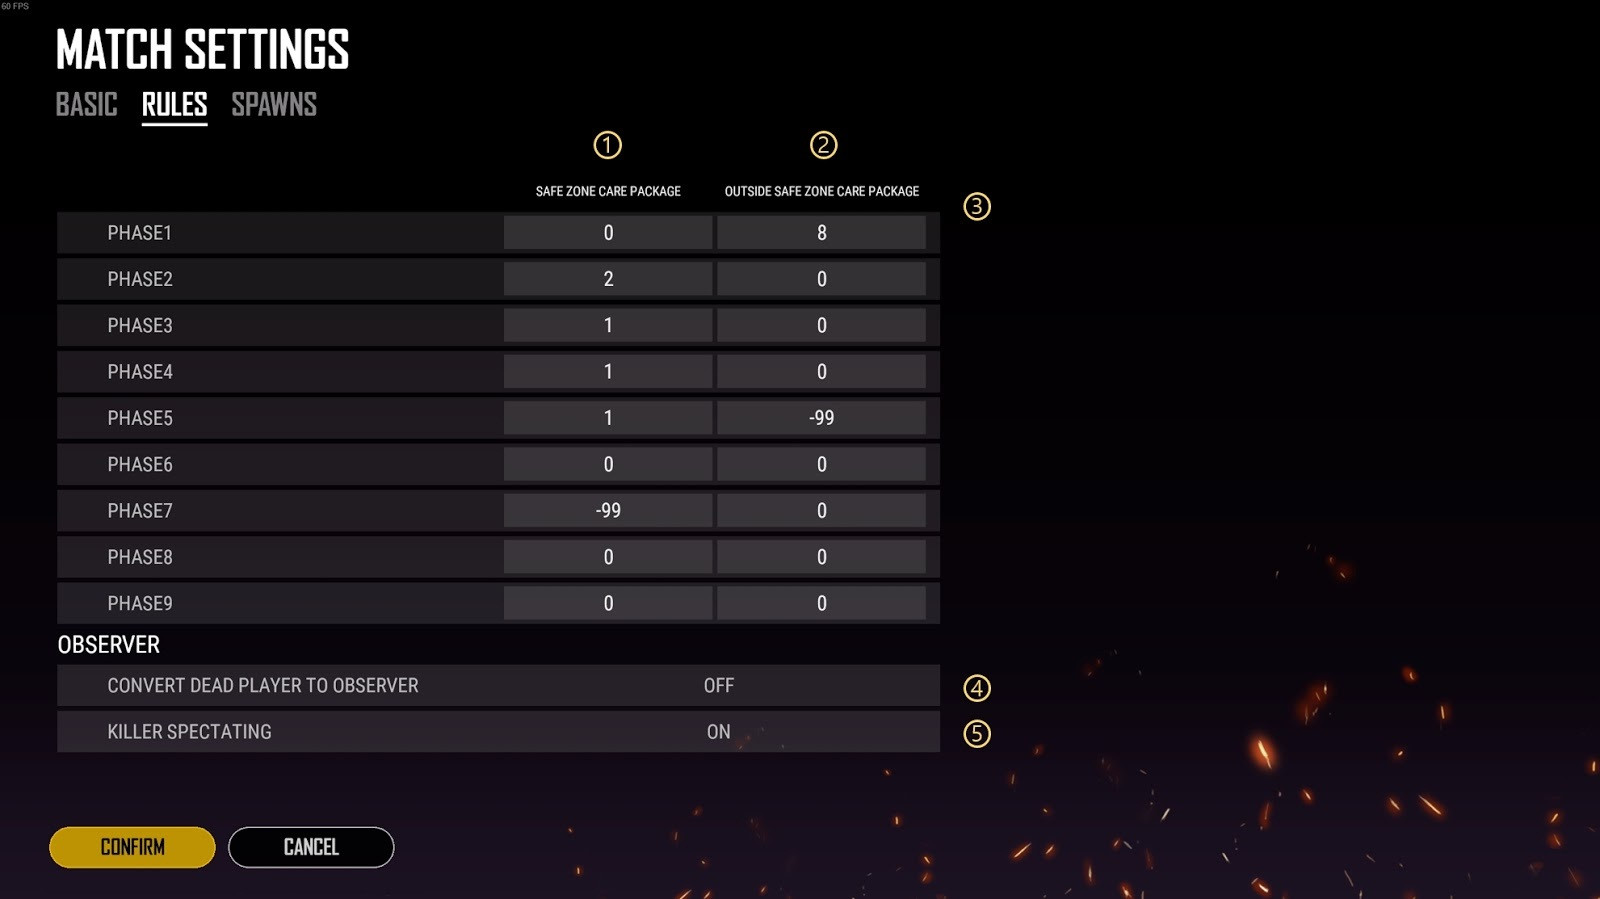
- Adjust the total number of special care packages available to be dropped per phase when shooting a flaregun inside the safe zone (white circle). Remaining available air drops will be rolled over into the next phase.
- Adjust the total number of armored vehicles available to be dropped per phase when shooting the flaregun outside the safe zone (white circle).
- Remaining available air drops will be rolled over into the next phase. When this is set as -99, it will reset the accumulated crates available.
- Choose whether to automatically convert dead players to observers. The option labelled “ONLY HOST” means that only the creator of the custom match will be converted to an observer upon death.
- Toggle killer spectating on or off.
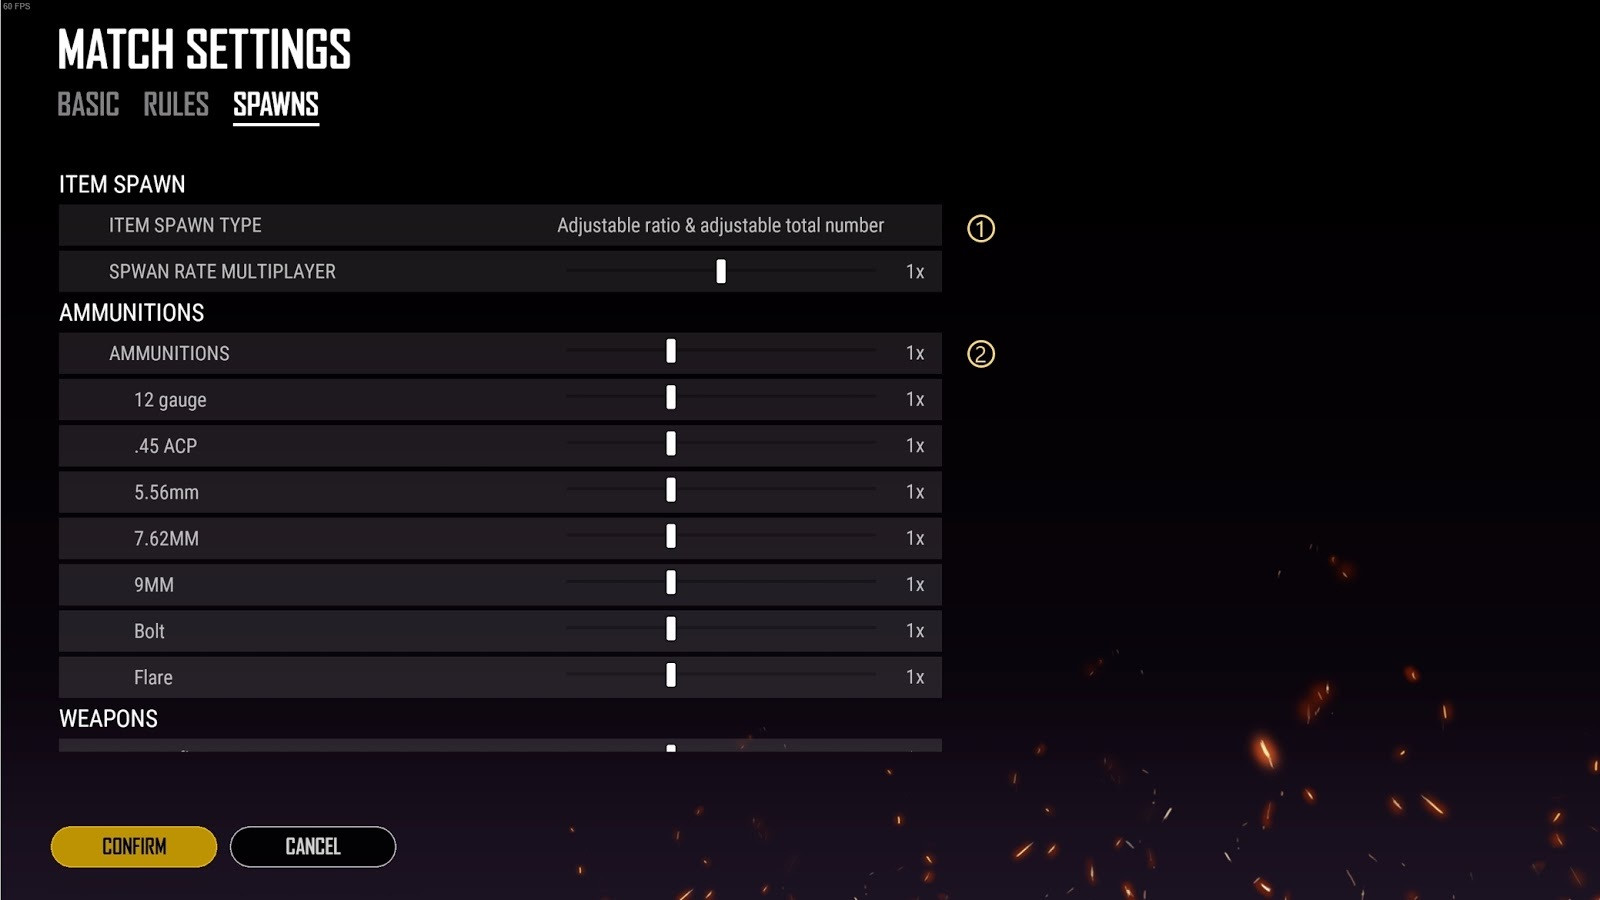
- Adjust item spawn ratio and the total spawn amount of all items. There’s three overarching options here which we can explain quickly:
- “Fixed Ratio & Adjustable Total Number” means that when you adjust the multiplier for any given item, it only affects the spawn rate of that item.
- “Adjustable Ratio & Fixed Total Number” means that the overall number of items spawned will be the same no matter what. So when you adjust the multiplier for any given item, it affects how often it spawns relative to other items.
- “Adjustable Ratio & Adjustable Total Number” allows you to adjust the overall spawn rate for all items while also adjusting the relative spawn rate of items within that pool.
- Adjust spawn rates for specific items. For each item category (like “Ammunitions” or “Weapons”) you can also adjust the overall spawn rate for that type of item. Setting “Ammunitions” to 0 means that no ammunition of any type will spawn.
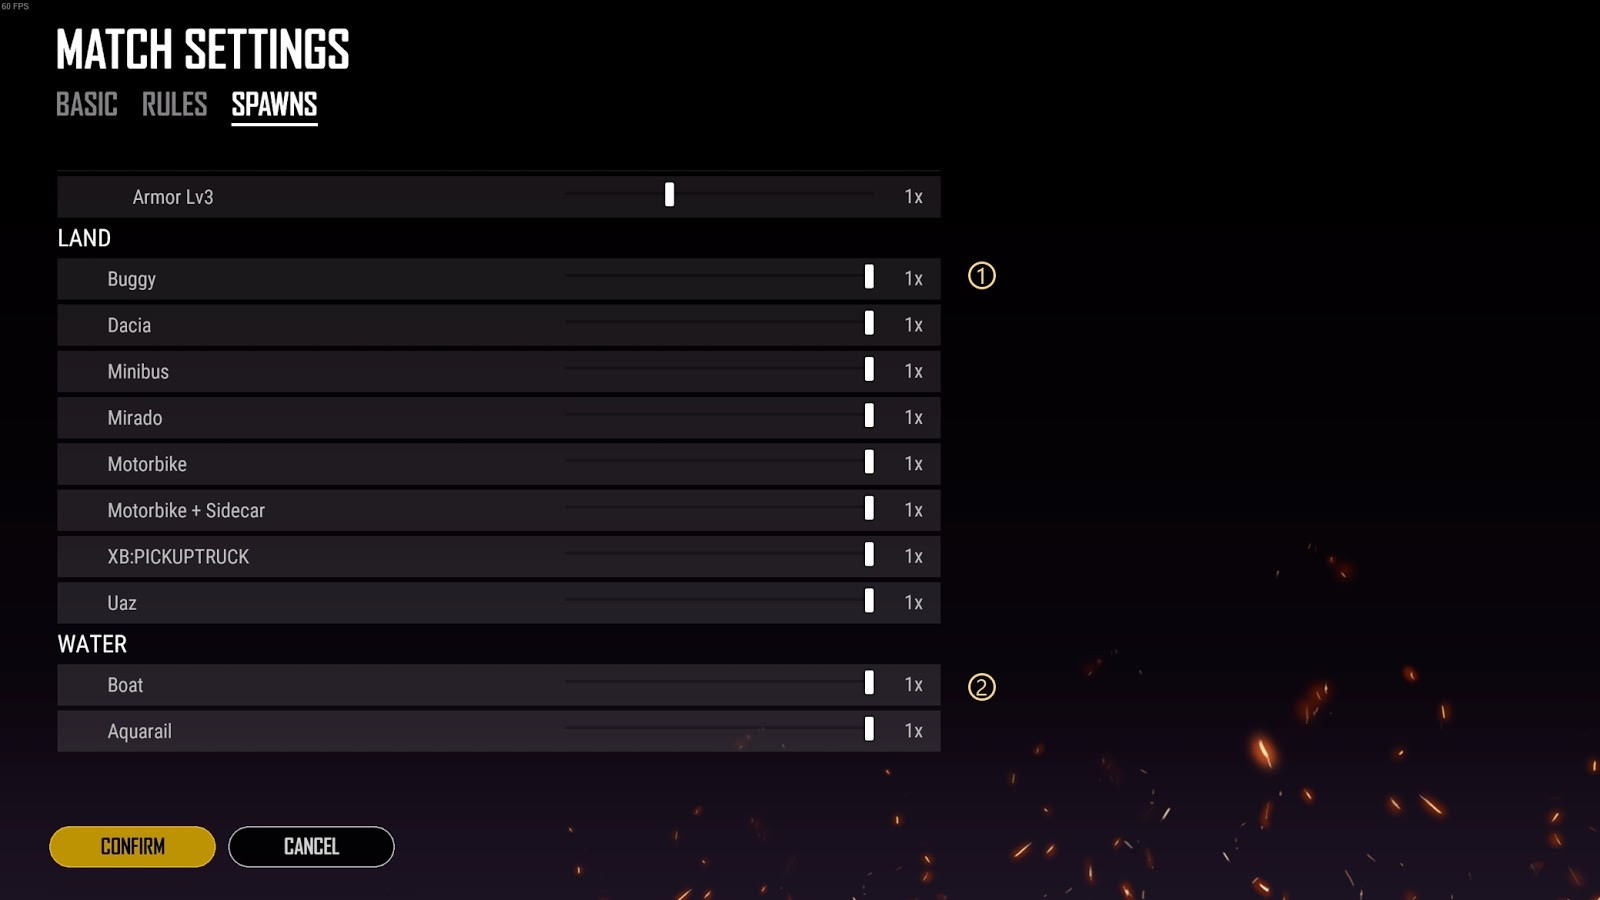
- Adjust spawn rate of land-based vehicles, compared to normal settings.
- Adjust spawn rate of water-based vehicles, compared to normal settings.
- Name your custom match and set it to either public or private (with a password).
- Select Zombie Mode.
- Select a preset—more of these will be made available over time.
- These are default settings which are necessary to create any custom match.
- The game will be created on the regional server location selected on the lobby screen.
Note: Currently a minimum of 10 players are required before being able to start the match.
Once the lobby is created, you can then access the following settings via the “Match Setting” button.
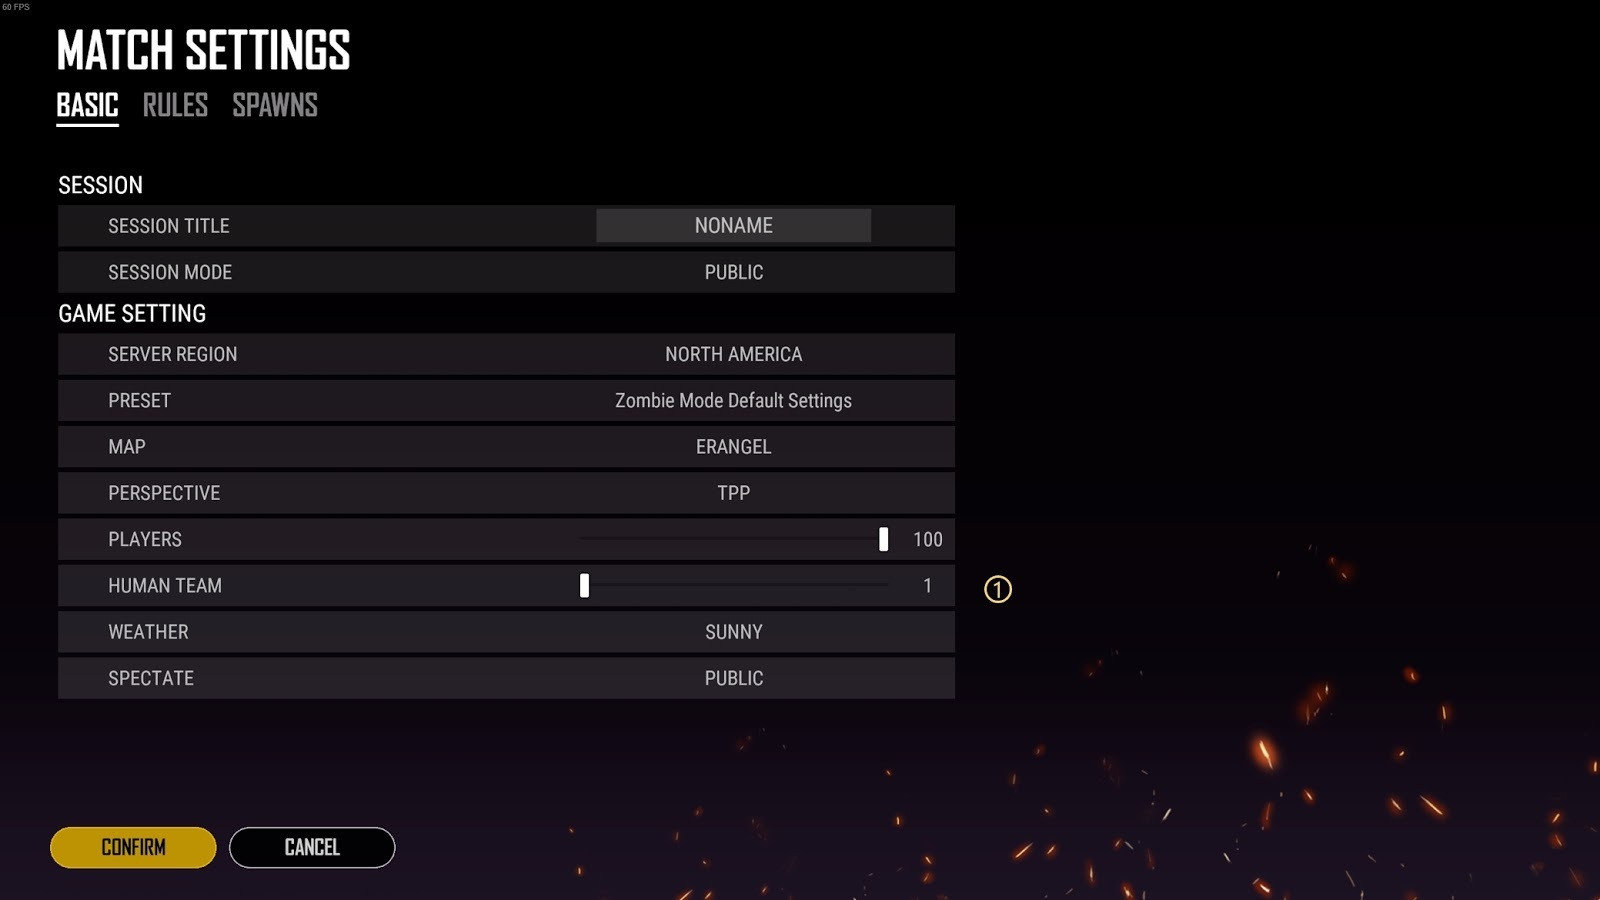
- Set the total number of players on the Human team.
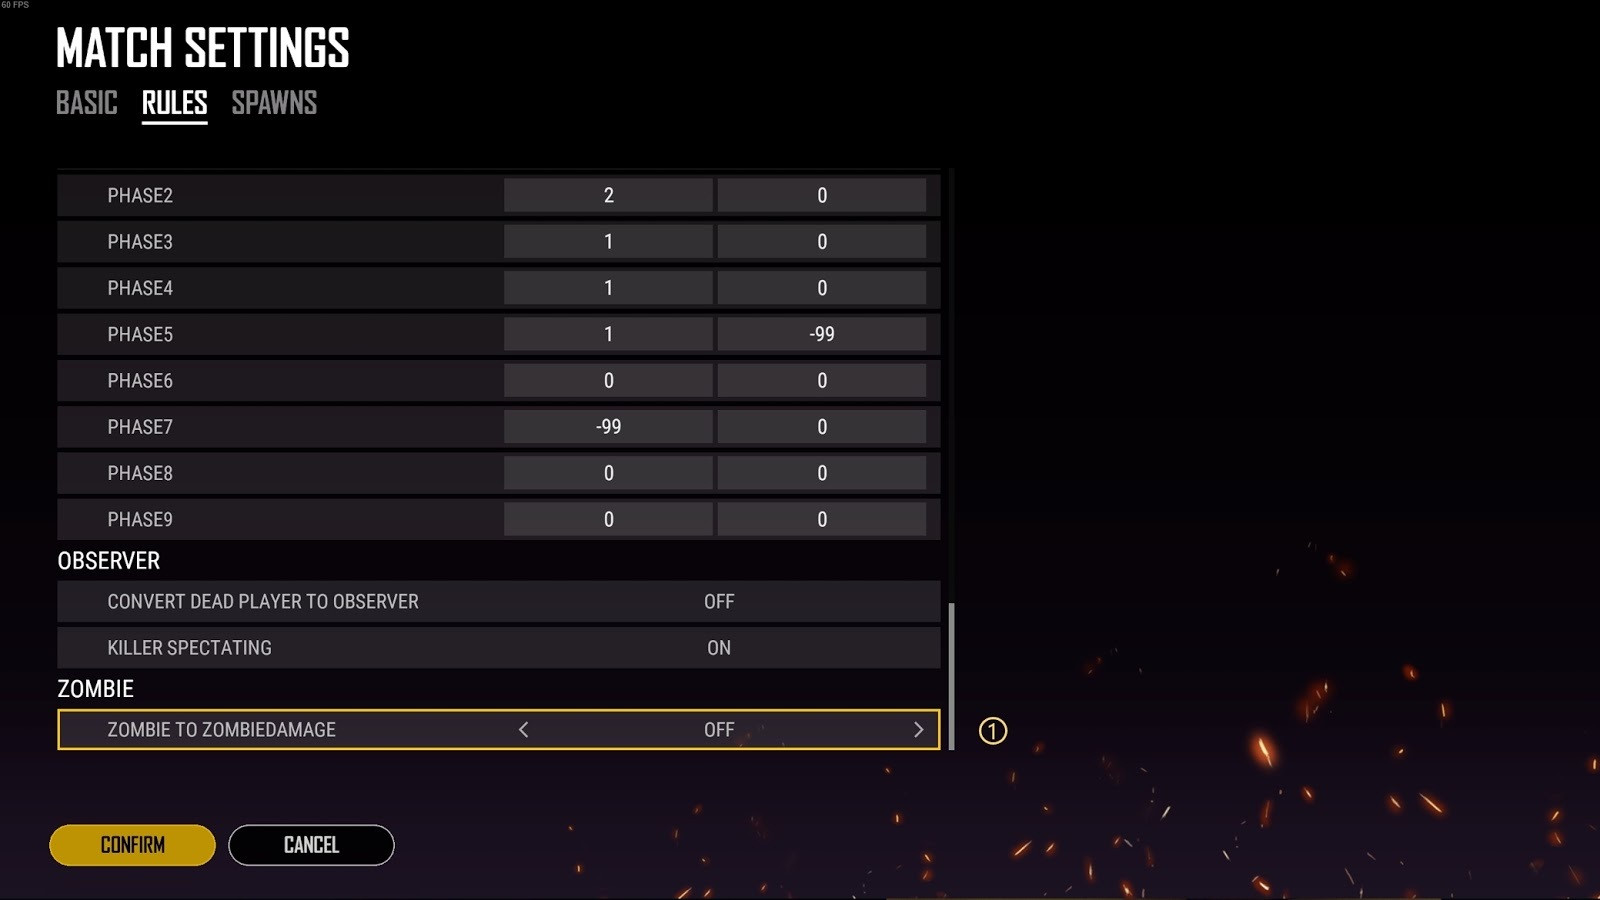
- Determines whether zombies can attack each other.
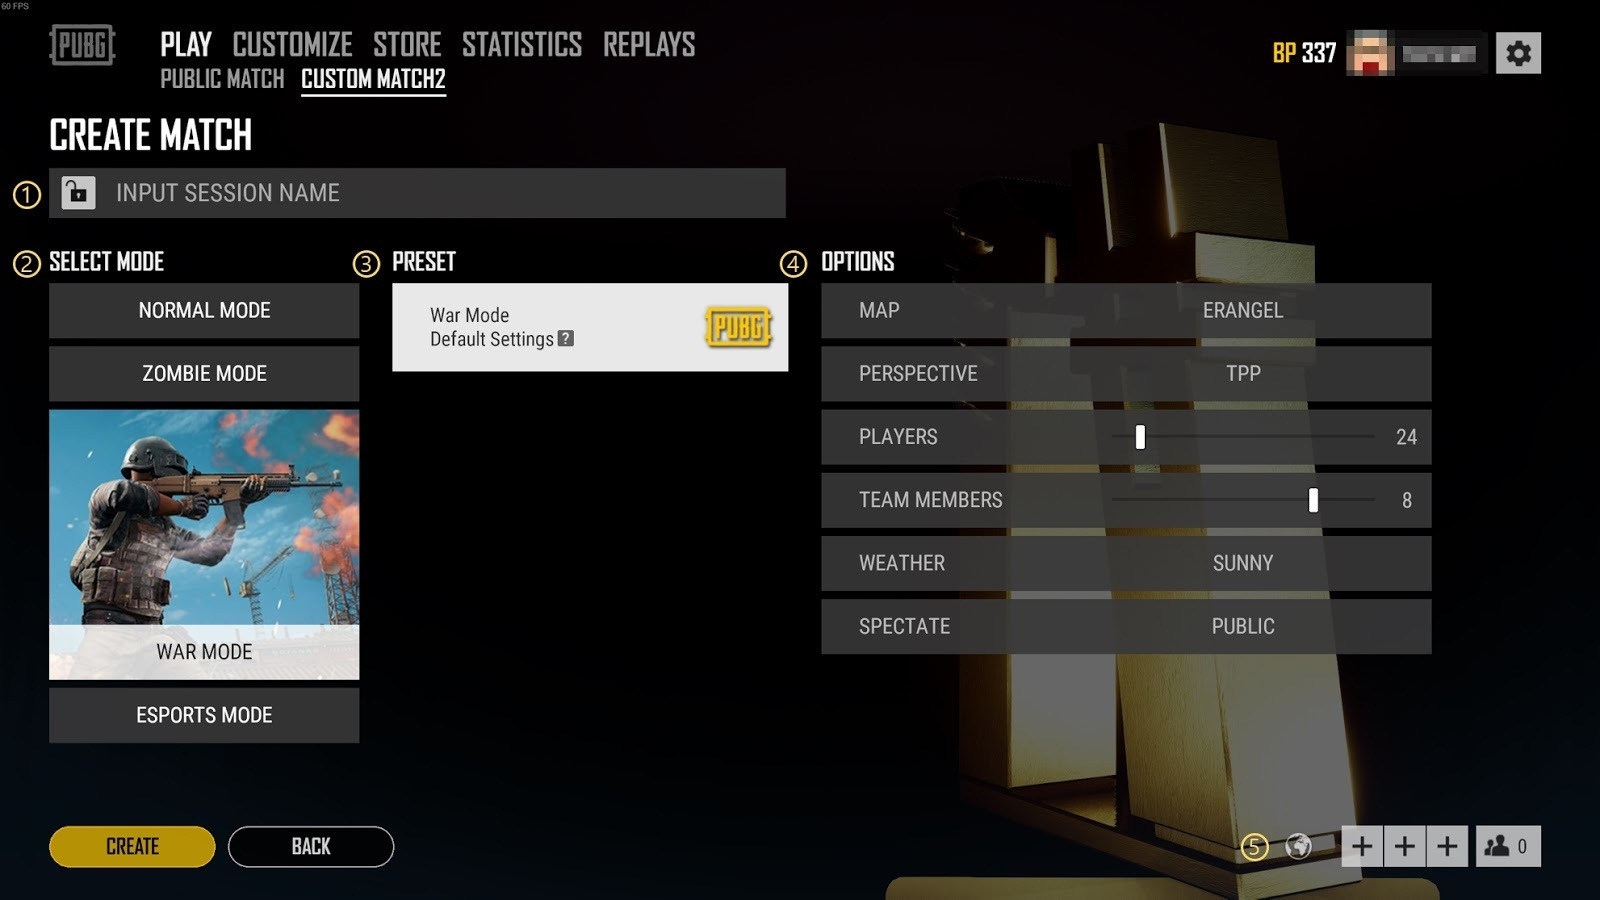
- Name your custom match and set it to either public or private (with a password).
- Select War Mode.
- Select a preset—more of these will be made available over time.
- These are default settings which are necessary to create any custom match.
- The game will be created on the regional server location selected on the lobby screen.
Note: Currently a minimum of 10 players are required before being able to start the match.
Once the lobby is created, you can then access the following settings via the “Match Setting” button.
- You can change your custom match name here.
- Choose whether your session will be public or private (with a password).
- Displays selected server region. It will default to the region you’ve set on the main menu lobby screen and can’t be changed here.
- Set the current game mode preset (not implemented yet, but will be updated in the future).
- Select the map.
- Select the perspective you want your match to be played in.
- Set the max player limit for your match. 10 players are required before the match can start.
- Set the number of players per team.
- Set the weather for the match.
- Set the spectate function to public or private.
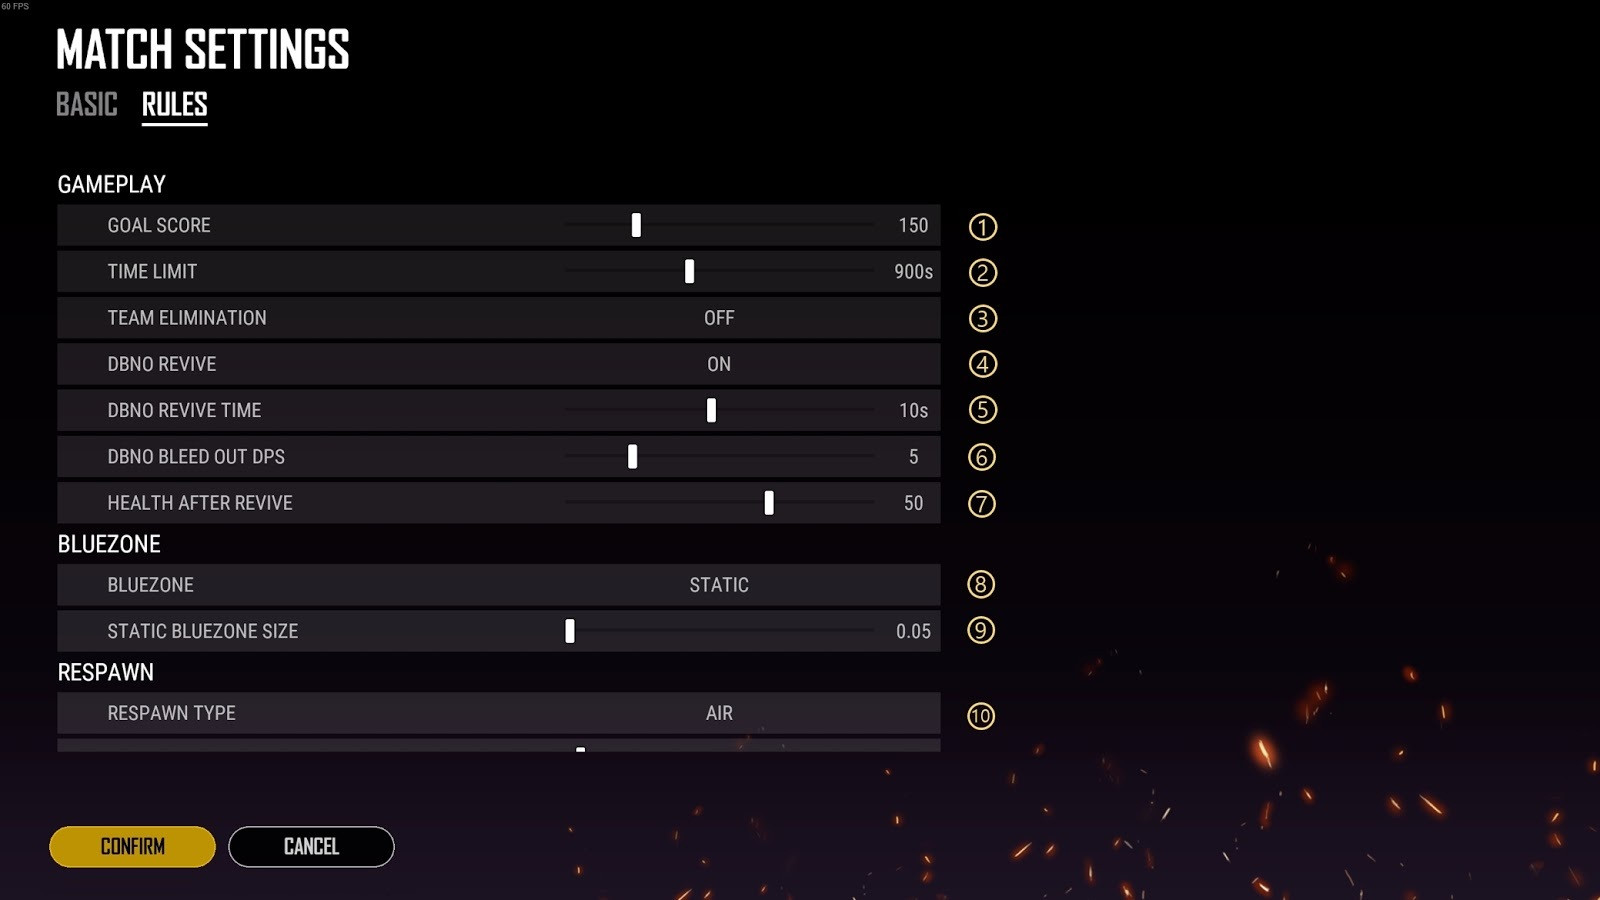
- Set a target score as one possible win condition.
- Choose a time limit. This will cause the match to end even if no team has reached the “goal score.” If that happens, the team with the highest score wins.
- Toggle on/off the option to stop teams from spawning if all players in the team are eliminated.
“DBNO” refers to “Down But Not Out.” If turned off, kills will be instant (no “knocks”). - Adjust the amount of time required to revive downed players.
- This controls how quickly downed players bleed out.
- Set how much health players will have after being revived.
- If set to “Static,” the blue zone won’t ever move in during the match. If set to “WARROYALE” the safe zone will shrink over the course of the match.
- Adjust this number to increase or decrease the size of the safe zone.
- Set the respawn type (for now it’s limited to “AIR,” which means you spawn in the plane).
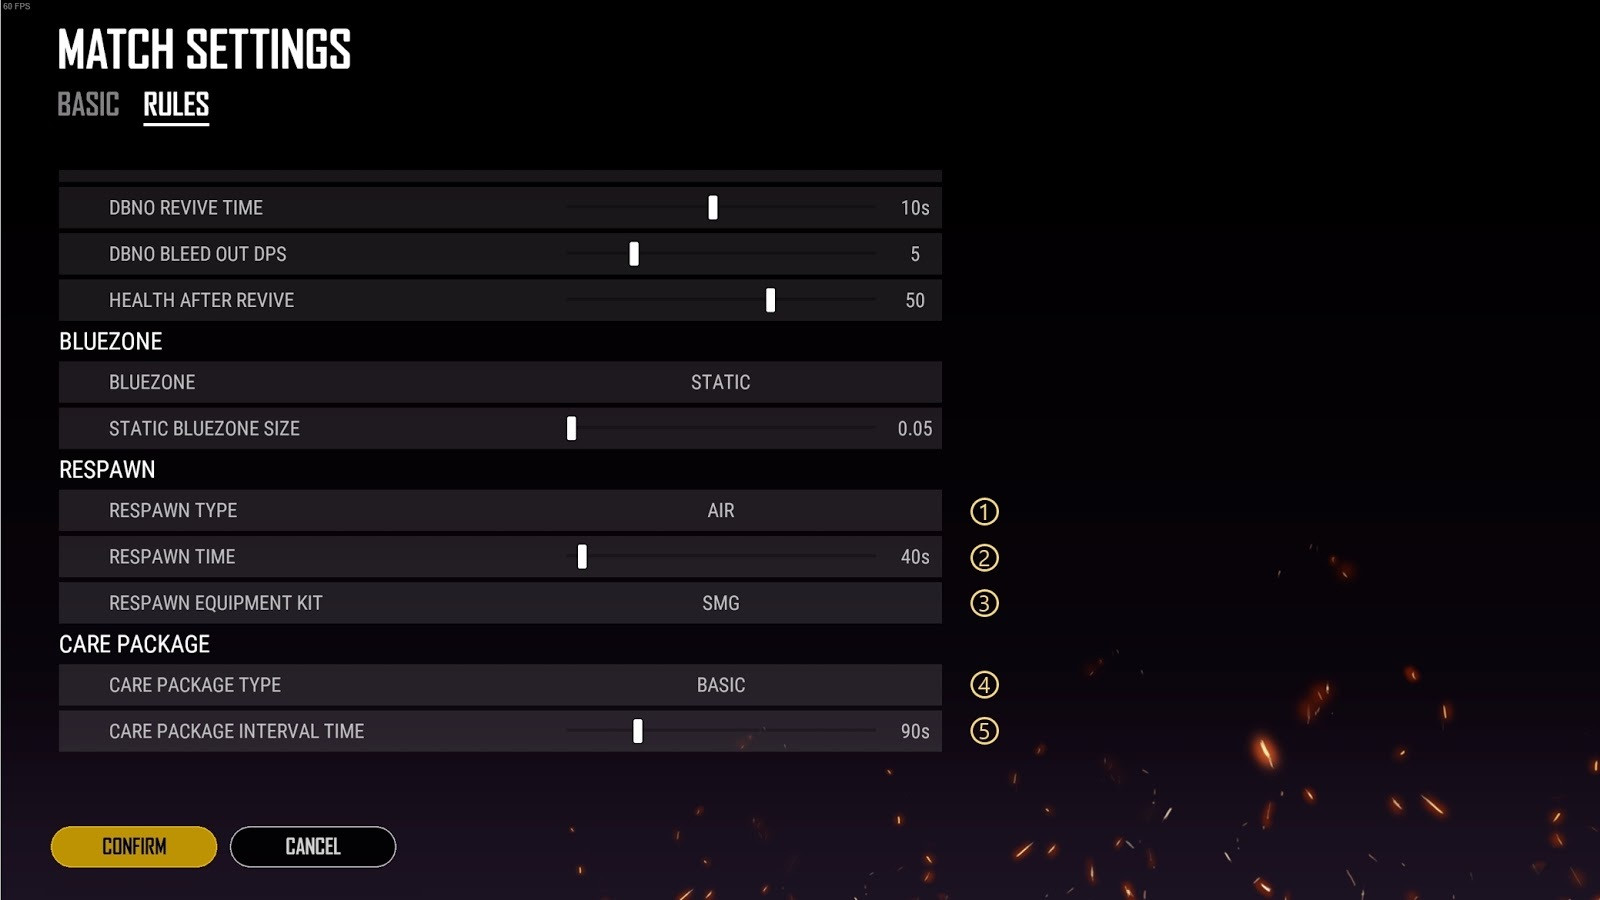
- Set the respawn type (for now it’s limited to “AIR,” which means you spawn in the plane).
- Set the respawn timer. Respawns will happen in waves at intervals of the time you choose.
- Select the default loadout kit to spawn with (this includes your first drop).
- Choose from Soldier, Sniper, Random, Crossbow, Western, Overpower, Bomb, Melee, Frypan, AR, Pistols, Shotguns, SMG.
- Select the item spawn type contained in care packages.
- Set the frequency that care packages drop.
- Name your custom match and set it to either public or private (with a password).
- Select Esports Mode.
- Select a preset—more of these will be made available over time.
- These are default settings which are necessary to create any custom match.
- The game will be created on the regional server location selected on the lobby screen.
Note: Currently a minimum of 10 players are required before being able to start the match.
Once the lobby is created, you can then access the following settings via the “Match Setting” button.
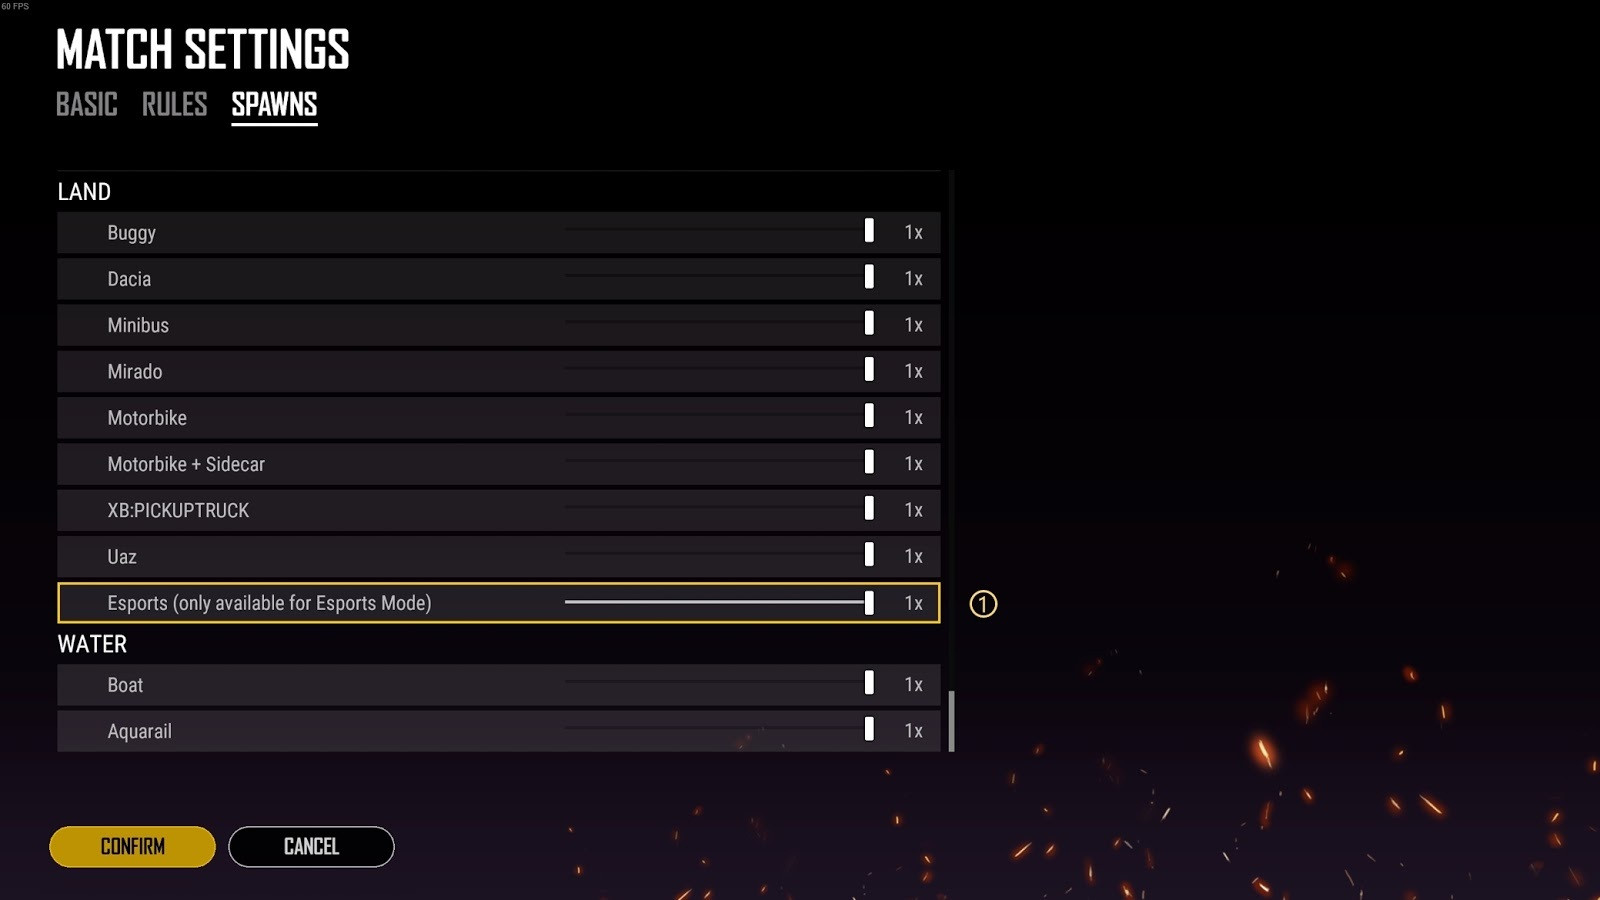
- Control esports exclusive vehicle spawn rate.
- Nothing mechanically different here, just a snazzy new paint job for the Dacia and Mirado.
See you in-game!
Thanks for playing,
The PUBG Team
Origin: steamcommunity.com


Comments